本文共 1928 字,大约阅读时间需要 6 分钟。
我的CuteKe网站已经上线一段时间了,访问也慢慢上去了,我也决定开新坑啦,这个系列我会把在开发这个网站的所有遇到的问题和困难记录下,每一章的标题和内容围绕两个主题来,自己本身也在读信息安全的研究生,所以开发和安全都会兼顾,希望能帮助大家能安全开发网站。
再次强调一下我的网站是站在巨人的肩膀——老卫的上的,在这基础上修复了bug添加了很多功能,有兴趣的同学可以上慕课网学习这门课程。用到的相关技术也可以访问老卫的
1. CuteKe网站架构
让我们总体来看一下架构图:
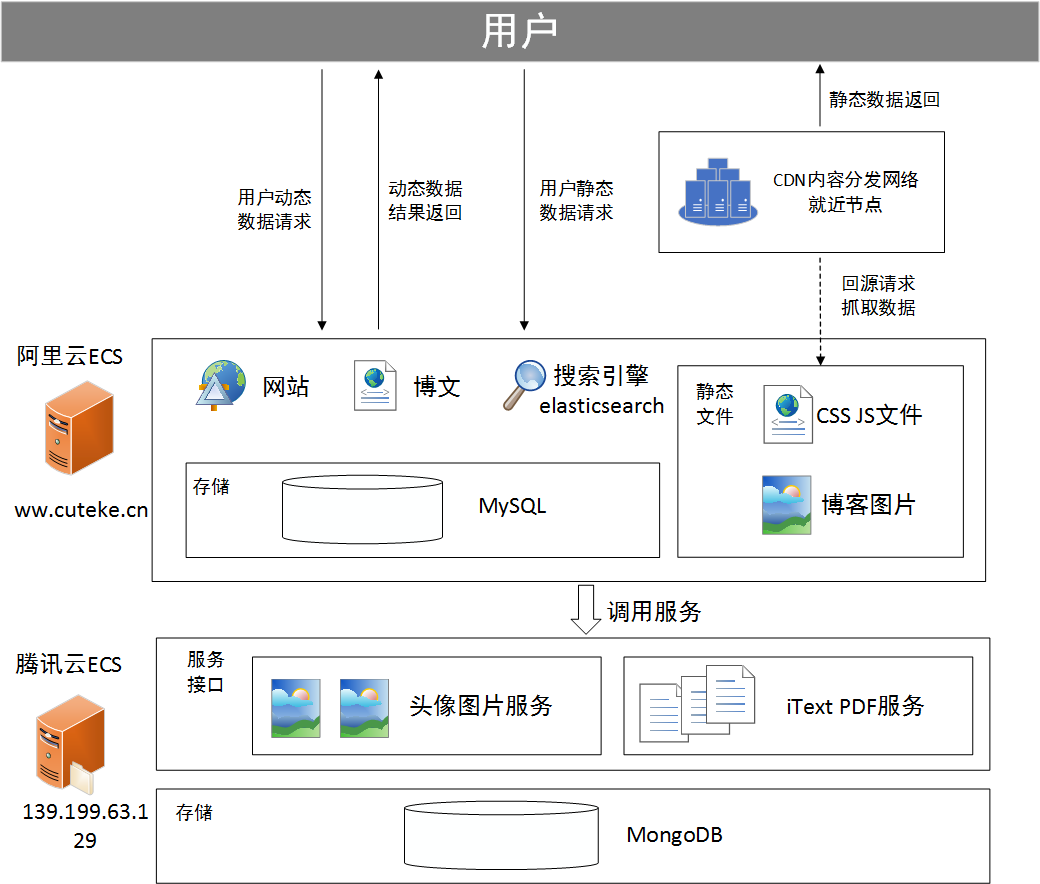
可以看到我这里是购买了两个服务器,阿里ECS和腾讯ECS,两个服务器上部署不同服务:
- 阿里云ECS:
- 主要负责个人网站主服务,页面展示
- 同时部署elasticsearch服务,提供快速的页面搜索
- 博文采用MarkDown语法,方便快捷存储
- 提供PDF的页面,方便用户操作
- 博客系统的除头像外所有的功能实现
- 腾讯云ECS:
- 后台服务模块,如果放在企业真实环境中,应该和阿里云ECS在同一内网
- 文件存储服务,支持上传文件和查看文件
- 头像上传服务器,博客系统用户的头像上传
- iText PDF服务,提供PDF相关的各种服务
实际应用中如果两个服务器出于同一局域网中的,带宽是很大的,两者之间的传输速度也是非常快,消耗时间也可以忽略不计,但是我的阿里云ECS和腾讯ECS的带宽都只有1Mbps,小的可伶,所以原本是由阿里云ECS上调用腾讯云ECS上的服务的,为了加快速度,都是由客户端调用腾讯ECS上的服务,少了中间的阿里云ECS,没办法,穷的代价>_<
2. CuteKe网站更新记录
一个网站如果都由一个人来开发的话,需要不断的积累,不断的实践,同时也要做好每次改动和更新的记录,在这里就把CuteKe网站的所有更新记录给大家看看(基本上每周更新一点,持续更新中):
-
2018年3月1日之前
- 这个时期主要是看一些关于java web的书籍,例如《Spring实战(第4版)》、《Hibernate实战(第2版)》等,打下扎实的基础
- 设计了网站后台数据uml类图,完成了自己写的Hibernate的数据库实现
- 找了很多前端模板,但是发现改起来非常麻烦,自己对前端的知识了解的不是很多
- 陷入迷茫中…
-
2018年3月2日-3月14日
- 在慕课上发现了很多关于Java网站开发的课程,开始认真学习
- 购买课程,
- 发现里面使用的前端的框架都比较基础,解决了自己不会画页面的烦恼
- 以后的开发都在此基础上展开
-
2018年3月15日
- 增加角色——普通用户
- 普通用户不能写博客,只能点赞和评论
-
2018年3月16日
- 访问量设置规则:每个IP每天每篇文章最多只记录5次访问记录
- 管理员页面能管理评论和博客
-
2018年3月17日
- 404/500错误对应页面设计
- AOP处理访问记录
-
2018年3月18日
- 访问记录日志文件化
- 修改加密方式为md5+salt
-
2018年3月24日
- 添加了登录失败提示
- 修正了新注册用户密码没有加密存储问题
-
2018年3月25日
- 管理员页面添加/修改和用户注册时账号名/邮箱不能重复
- 解决不同用户之间相互访问,展示不同角色页面的问题
-
2018年3月31日
- 管理员页面添加用户密码没有加密处理bug修复
- 同步博客到ElasticSerach,解决数据库修改和还原后首页显示错误
-
2018年4月1日
- 分类管理时检查是否重复
- 添加页面分享功能
-
2018年4月5日
- 后台修改了markdown渲染器,改为markedj
- 修改前端markdown展示CSS效果
-
2018年4月6日
- 删除分类的同时也会删除文章
-
2018年4月7日
- 定时备份数据库
- 初步优化手机布局
-
2018年4月14日
- 尝试博客展示页面SEO部分优化
- 解决中文账户名会导致url解析乱码
-
2018年4月15日
- 改变背景图片,点赞评论浏览次数左对齐,更改点赞图标,a标签文字,摘要文字
- 目录随页面滚动
-
2018年4月21日
- 访问记录数据库化
- 根据ip查询相应的真实地址
- 上传项目到Github,同步更新
-
2018年4月22日
- 优化手机上部分页面布局
- 退出文章置顶功能,后台暂时没有页面实现,不过可以通过修改数据库值来实现
-
2018年4月30日
- 修改MondoDb默认端口,不外网监听,同时添加对于数据库用户
- 定时备份MongoDb数据,修改MySQL监听端口
-
2018年5月1日
- 静态文件CDN优化,加快反应速度
-
2018年5月6日-5月20日
- 腾讯云CuteKe-file-server更新基于iText的简历生成器服务
- 阿里云CuteKeBlog更新简历生成器的页面前端
-
2018年6月2日-6月3日
- 编写上传系列文章3,4,5
转载地址:http://lxjnz.baihongyu.com/